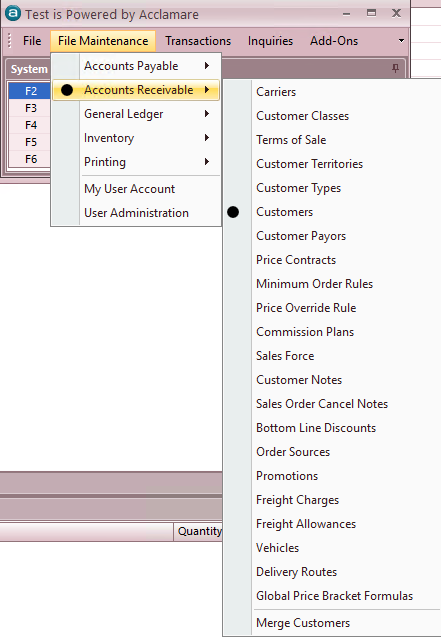
Within this function you will Create New Customer Records and View or Edit Existing Customer information.
Below are the input screens for each type of customer information with instructions.
Shaded fields are either not required or are for system-generated information.
Account Number – This field is user defined, or the company can use the + icon located on the right hand side of the field to have Acclamare automatically generate a unique account number.

Name – Customer Company NameAlternate Name – Alternate company name (and DBA or other common cross reference name)Status – Choices are OPEN, HOLD, CLOSED or PROSPECT. Select from drop down menu.Class – Select from drop down menu. Customer Class is user defined and can be used to group customers for reporting, as well as other functions.Type – Select from drop down menu. Customer Types are user defined and can be used to group customers for reporting, as well as other functions. Types such as OEM, Reseller, and End User etc. Territory – Select from drop down menu. Territories are user defined and can be used to group customers for reporting, as well as other functions.Taxable – If customer is taxable, check the box in this field so that sales will be taxed.Tax Exempt Number – If you have received a State Resale Certificate it will have the Sales and Use Tax Permit Number shown. Enter that number in this field for our records.Tax Entity 1,2,3,4 – Taxing entities are created by the company in accordance with the company’s tax collection and reporting requirements. They are assigned to these fields via a drop down choice. Include In Mailings – This field is used for filtering in custom reports you may create.
CREDIT INFO
ORDERS AND INVOICES
SHIPPING AND BILLING
Terms – Select Payment Terms from drop down menu.
Allow Late Discount – Check this box if Acclamare should allow late discounts for customer.
Summary Billed – Check this box if invoices are summary billed.
Residence – Check box for YES if determined by carrier (UPS).
Outside City Limits – Check box for YES if determined by carrier.
Service – Select from drop down menu.
default carrier service
FOB – Select from drop down menu unless otherwise instructed.
SOURCE
UPS Account Number – Enter Customer’s UPS Account Number if provided.
FedEx Account Number – Enter Customer’s FedEx Account Number if provided.
Freight Payment Method – Select from drop down menu – choices are ADD TO INVOICE, USE CUSTOMER ACCOUNT, MANUAL CHARGE, NO CHARGE and PREPAID.
Freight Charges – Select from drop down menu, if manual freight charge tables are used.
Freight Allowance – Select from drop down, if manual freight allowance tables are used.
Invoice Delivery Method – USED ONLY FOR REPORTS. Select from drop down menu – choices are MAIL, FAX and E-MAIL. NOTE: You must use the Document Setting Maintenance to manage the details of how each type of document is sent.
Payor – Enter the Account Number for the Payor if different from the Customer Account.
Use Payor Address for Billing – Check box for YES if the invoices are to be mailed to a central Payor address, different from the Billing Address in the individual Customer Master File.
RETURNS
BILLING INFORMATION
Address / City / State / Zip / Country - Enter the entire BILL TO address information for the individual customer. This will print on the invoice.
Phone Number – Enter the phone number for the A/P contact
Fax Number – Enter the fax number for the A/P contact. This does not need to be the same as the fax number used to send invoices that will be controlled by Document Setting Maintenance.
NOTE:
Web Site – Enter the customer’s web site if provided.
Email Address – Enter the e-mail address for the A/P (collections) contact for this customer. This does not need to be the same as the e-mail address used to send invoices that will be controlled by Document Setting Maintenance.
NOTE:
SHIPPING INFORMATION – (ONLY NEEDED IF DIFFERENT FROM BILLING INFO).
Same As Billing – Check this box to copy details from the Billing Information section.
Address / City / State / Zip / Country - Enter the entire SHIP TO address information for the individual customer. This will print on the invoice.
Phone Number – Enter the phone number for the delivery contact
Fax Number – Enter the fax number for the delivery contact.
Web Site – Enter the customer’s web site if provided.
Email Address – Enter the e-mail for UPS delivery notification. .
Leave blank otherwise
CUSTOMER MASTER FILE MAINTENANCE - This sub-menu within the Customer Master File includes various settings for the Customer that can be created, viewed or edited as required.
CUSTOMER LOCATION MAINTENANCE
– is where you will create, view or edit individual contacts for a customer. It is used to store and maintain customer credit card details and by other transactions to enable you to select a contact for document transmittal, such as Order Acknowledgements. .
CUSTOMER CONTACT MAINTENANCE
This file must be created for all credit card sales
The first contact built for a customer will automatically bring up the fields to fill when you open Contacts from the Maintenance Menu in the Customer Master File. Enter the contact name in the left panel and complete all remaining fields possible in the right panel.To add more contacts, Click on the icon for New Transaction and repeat steps as above.If a customer has multiple contacts you can sort the list alphabetically by clicking on the arrow symbol to the right of the “Name” column header.You can view the details of each contact by tabbing through the list on the left side of the screen or by sliding the navigation bar at the bottom of the right side.